How do you read greens in golf? It involves assessing the slope, grain, and speed of the green to predict the ball’s path and make accurate putts. Mastering this skill is crucial for lowering your scores and improving your overall game.
For example, understanding how the grain affects the ball can help you navigate tricky putts. With practice, you’ll be able to read greens more effectively, leading to more successful rounds on the course.
Understanding the slopes on greens is crucial for making accurate putts. If you can read the terrain, you’ll have a better chance of sinking that ball. Let’s dive into the different types of slopes you might encounter.

Understanding Green Slopes
Greens can vary greatly in their slope, and recognizing these differences can change your approach to putting. Whether you’re facing an uphill or downhill slope, each type will affect how you read greens in golf.
First, let’s talk about the two main types of slopes: uphill and downhill. An uphill putt typically requires more force. You need to hit the ball harder to get it to the hole. Conversely, a downhill putt requires a lighter touch, as gravity will pull the ball faster towards the hole.
The slope affects ball speed significantly. An uphill putt slows the ball down, while a downhill putt speeds it up. This means you’ll need to adjust not just your strength, but also your aim. A slight miscalculation can lead to a missed putt.
Assessing the Slope
One effective way to assess slope is by using a level. Place it on the green to see how much it tilts. This can give you a clearer idea of how drastic the slope is and how it will impact your putt. If you don’t have a level handy, simply walk around the area and observe how the grass lies.
Imagine you’re on the 18th hole, facing a challenging downhill putt. You notice the green slopes away from you and towards the hole. You know you need to hit it gently but accurately. You take a deep breath, line up your shot, and trust your read. That understanding of slope could make all the difference in your game.
Pay attention to the slopes on the greens you play. Every small detail can help you improve your putting and lower your score.
When you’re on the green, understanding the grain of the grass can make a huge difference in your putting. Knowing how to read the grain helps you predict how the ball will behave, which is crucial for sinking those tricky putts.
Evaluating Green Grain
The grain refers to the direction that the grass grows on the putting green. This subtle feature can significantly affect how your ball rolls, so recognizing it is key to improving your game.
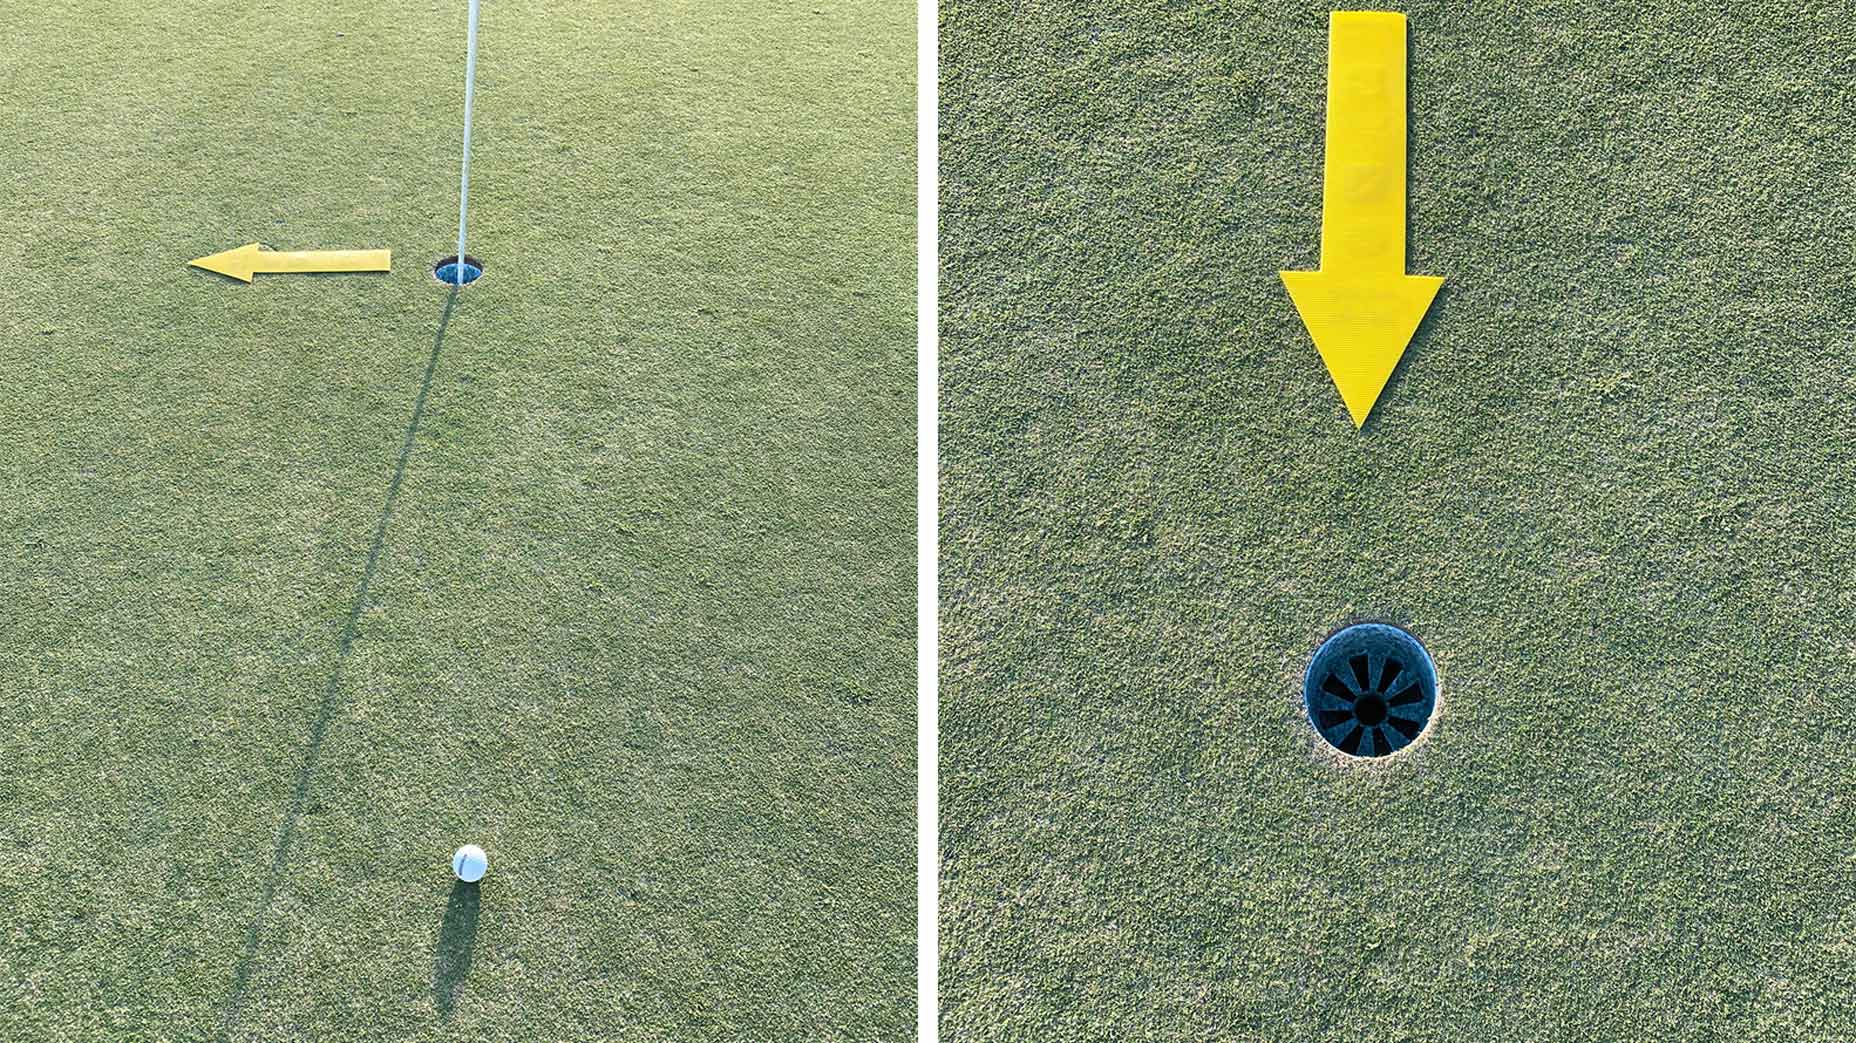
Identifying grain direction is essential for accurate putt readings. Generally, grass grows towards the sunlight, which means the grain will lean toward the sun’s position. If it’s a sunny day, you can usually find the grain by looking for the direction the blades of grass are leaning. They’ll often bend towards the sunlight, and that’ll help you figure out how the ball might roll.
Effects of Grain on Ball Roll
Grain can either speed up or slow down your putt. When you’re putting with the grain, the ball tends to roll faster. Conversely, against the grain, the ball will slow down significantly. For example, if you’re on a green that has a strong grain running towards the hole, you might need to adjust your force. A putt that looks straightforward can become tricky if you don’t account for the grain.
One way to practice reading greens is to take a moment to walk around the green before you putt. Look at the grass closely and see if you can spot where it’s growing. This can help you get a feel for how the grain will affect your shots. Plus, it’ll build your confidence when you’re faced with a challenging putt.
Understanding how to read greens in golf, especially the grain, is a game-changer. By paying attention to these details, you’ll not only improve your putting skills but also enjoy the game even more.
Understanding green speed is crucial for effective putting. If you want to sink more putts, you need to assess how fast the greens are running. This knowledge helps you adjust your strokes accordingly.

Assessing Green Speed
Green speed can dramatically affect your putting strategy. A fast green requires a lighter touch, while slower greens allow for more power in your stroke. Let’s dive into how you can measure and adjust to green speed.
One of the most reliable tools for measuring green speed is a stimpmeter. This device helps you gauge how far a ball will roll on the green. By placing the stimpmeter at a set angle and releasing a ball, you can see how far it travels. The distance gives you a clear idea of the green’s speed.
Besides using a stimpmeter, several factors influence green speed. Weather conditions like rain can slow greens down, while a hot, dry day might speed them up. The type of grass and maintenance practices also play a major role. For example, bentgrass typically provides a faster surface than Bermuda grass.
Adjusting Putt Strength Based on Speed
Once you’ve assessed the green speed, it’s time to adjust your putt strength. If you find the greens are rolling fast, you’ll want to ease up on your stroke. Conversely, if they’re slow, you’ll need to hit the ball with more force. This adjustment can make all the difference in sinking those crucial putts.
Imagine you’re on the 18th hole, facing a long putt on a fast green. You’ve measured the speed and know you need a light touch. By adjusting your strength, you confidently sink the putt to win the match. Mastering this skill will enhance your game and lower your score.
Next time you’re on the course, take the time to assess the green speed. It’s a simple step that can lead to big improvements in your putting game. How do you read greens in golf? Start with understanding their speed, and you’ll be one step closer to mastering your putts.
Reading breaks in the green is one of the most crucial skills you’ll develop as a golfer. Understanding how the terrain affects your putt can make all the difference in lowering your score.
Reading Breaks in the Green
Every green has its unique slopes and undulations. By identifying these breaks, you can visualize the ball’s path and improve your chances of sinking that crucial putt.
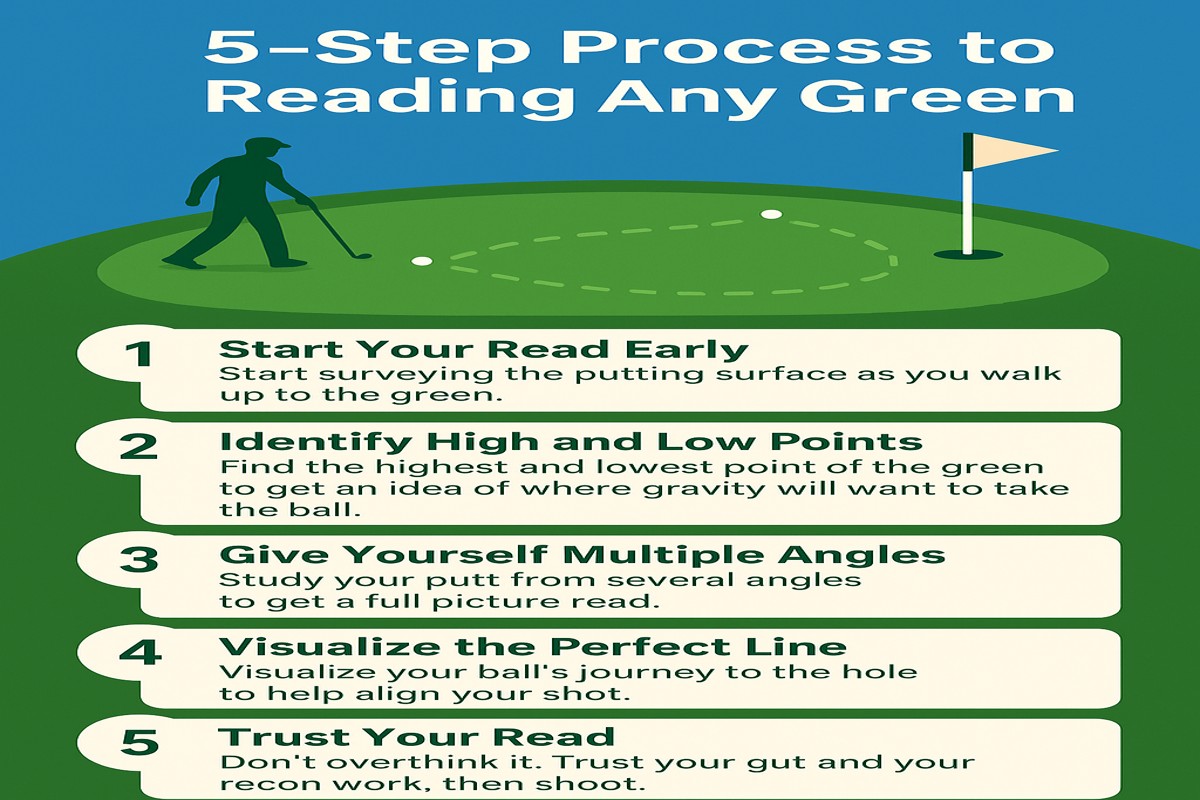
First, start by identifying the high and low points of the green. Walk around the putting surface and look for areas that slope downhill or uphill. This will help you understand how gravity will affect your ball as it rolls.
Next, visualize the ball’s path based on the breaks you see. Imagine where your ball will start and how it will curve as it approaches the hole. You might find it helpful to draw an imaginary line on the ground to guide your aim.
Practice Drills for Break Reading
To get better at reading breaks, you can do some simple drills. One effective exercise is to practice putting from various distances while focusing solely on the break. Choose a spot on the green and putt toward the hole, adjusting your aim based on the slope.
Another great drill is to play “break golf” with friends. Pick a hole and take turns putting from different angles. Discuss which way you think the ball will break and why. This can sharpen your decision-making skills on the course.
Imagine you’re on the 18th hole, and you’ve got a challenging putt with a noticeable break. You crouch down, assess the high and low points, and visualize the ball’s path. You make your best guess and sink the putt—now that’s a feeling you won’t forget!
Don’t rush the process. The more you practice reading breaks, the more intuitive it will become. Before you know it, you’ll be answering the question, “How do you read greens in golf?” with confidence!
When it comes to mastering green reading in golf, visual aids can be game-changers. They not only enhance your understanding of the green’s slope and contour but also boost your confidence during putts.

Using Visual Aids for Green Reading
Visual aids help you visualize the subtle details of the greens that might otherwise go unnoticed. Whether you’re a beginner or a seasoned player, these tools can refine your skills and make reading greens in golf much easier.
One effective method is using alignment aids. These can be simple tools like chalk lines or alignment sticks. By placing them on the green, you can create a visual reference point for your putt’s intended line. This helps you see the break more clearly and improves your overall alignment.
Practicing with markers can also make a significant difference. You can use tees or coins to highlight specific points on the green. For example, placing a marker at the spot where you believe the ball will break allows you to focus your attention on that area during practice. Over time, you’ll develop a better instinct for how the ball will react.
Technology Tools for Analysis
In today’s tech-savvy world, there are also various technology tools available to analyze greens. Apps that provide detailed maps of the greens can show you slopes, grain direction, and even the speed of the surface. Using these tools can give you a clear edge, especially on unfamiliar courses.
Imagine standing on the green, ready to putt, and pulling out your app for a quick check. You see that the slope is slightly more than you thought, and you adjust your aim accordingly. That small tweak could be the difference between a birdie and a bogey.
Incorporating visual aids into your practice routine can help you improve your green reading skills significantly. The more you use them, the more intuitive your readings will become, making the question “How do you read greens in golf?” a lot easier to answer. So, don’t underestimate the power of a little visual guidance on your path to becoming a better golfer.
Improving your green reading skills is essential for lowering your scores. By practicing specific drills, you can sharpen your ability to assess slopes and breaks, leading to more accurate putts on the course.
Putting Practice Techniques
When it comes to enhancing your green reading abilities, regular practice is key. Implementing targeted drills helps you understand various green conditions and develop a consistent approach to reading greens.
One effective drill for slope and break practice is to find a hill or sloped area on the putting green. Set up a few balls at different points and observe how the ball behaves as it rolls down the slope. This exercise will help you visualize how the ball will break on actual greens. You can also use markers to indicate where the ball starts and where it finishes, allowing you to track your accuracy.
Another great way to simulate different green conditions is to practice on various types of grass. If you have access to multiple courses or practice facilities, try putting on different surfaces. Each type of grass can affect the speed and break of your putts, so familiarizing yourself with these variations will enhance your skills. For instance, Bermuda grass often behaves differently than bent grass, so understanding these nuances can be a game-changer.
Consistency Through Repetition
Repetition is crucial for mastering how to read greens in golf. Create a routine where you practice your drills regularly, focusing on different aspects each time. Consider setting aside time each week solely for putting practice. This dedicated approach can help you internalize your learnings and make them second nature.
As you practice, try to incorporate different distances and angles. This variety will prepare you for the unexpected situations you’ll face on the course. For example, set up a series of putts from varying distances and angles, and keep track of your success rate. This will not only improve your green reading but also your overall confidence in making those crucial putts.
Remember, the more you practice, the better you’ll get. Make these drills a regular part of your routine, and soon, reading greens will become second nature. You’ll find that your scores start to improve as your understanding of green dynamics deepens.